The Agentic Software Development Lifecycle
Debatably there are four ways of using using AI in the software engineering process.
-
Engineers that don't touch it.
-
Engineers that use it as a form of searching or querying information.
-
Engineers that use it as a part of their engineering process, giving it access to the codebase and driving the AI the whole way.
-
Engineers that use have full agentic workflows - being hands off with the actual code output (i.e. Ralph Looping, GSD - Get [Crap] Done).
In daily discourse on the ol' X, internet people like to place engineers in one of these camps; that is very much not the purpose of this article at all. This article is focused on what the process of software engineering looks like if you are to go to the more extreme end of agentic engineering; framing the process with solid engineering principles, which includes acknowledging the pros and cons of the process.
It is stupid that I even have to say it, but there is validity in each of the approaches to using AI - and they (should) change depending on situation, or the problem to be solved, or the goals of the project.
In the event that you want to explore the capabilities of a full agentic workflow,
being as hands off as humanly possible, then this article is for you. And let's
be real, this information is going to be so outdated in 6 months - we will all be
laughing at the ignorance of such an approach as this. (In fact, it will be out of
date on June 15, 2026 with some of the announcements made by claude regarding their
removal of their Agent SDK and their claude -p).
Preface
It is worth pointing out that there were two primary goals for creating this software development lifecycle.
First, and most important, we had a goal of being able to live within the constraints of the Claude Max plan while performing full agentic workflows. This is both a cost saving measure as well as it allows us to have a fixed cost associated with our Agentic engineering efforts.
Secondly, we needed to establish a workflow that could easily be replicated and communicated with others. It allows for shared understanding of how to work agentically. It also allows us to have a baseline to test against if/when we want to change some part of the flow.
Aside from those hard requirements, there was a goal to do as much possible to keep the overall architecture sane.
The SDLC

The agentic software engineering lifecycle really isn't far off from what a good, standard software development lifececycle looks like. Unsurprisingly, what works well for humans works well when commanding agents. An oversimplification of the process is:
Project Requirements Document -> Architectural Review Document -> Implementation Tasks -> Engineering Work -> Quality Assurance -> Deployment
The biggest difference in an agentic workflow is that you must be thorough in the documentation if you want to have any chance of success. Success isn't only measured by whether the outcome of the results are functional, but whether the architecture of the system that is being built remains resilient.
The Product Requirements Document
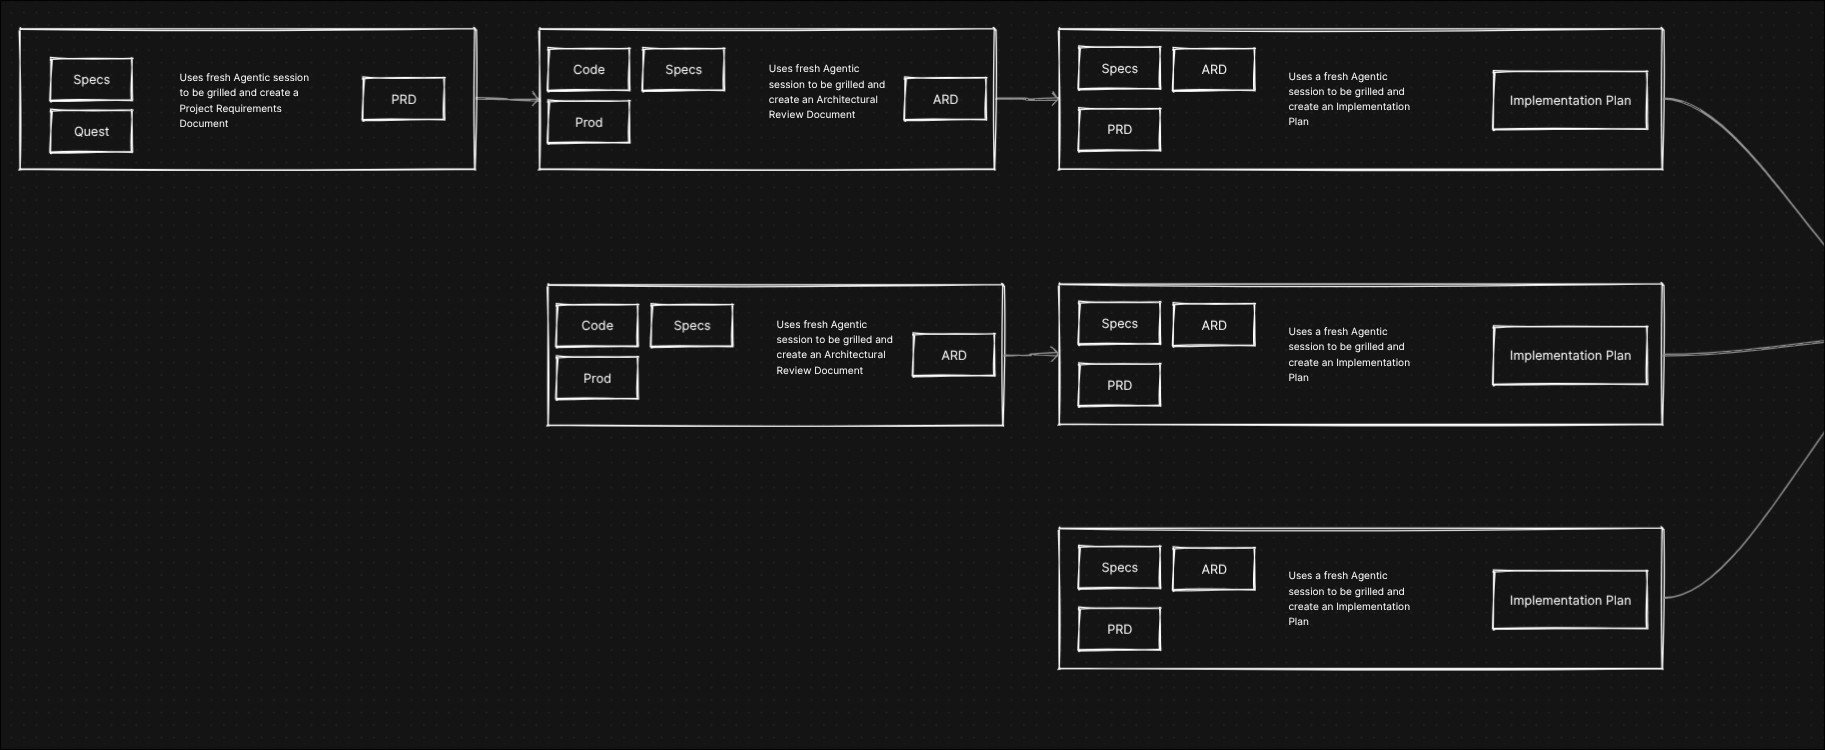
The purpose of the product requirements document (PRD) is to establish an understanding of what a feature is meant to accomplish. This should include building an understanding of general flows and functionality. It should avoid deep architectural decisions, generally looking at the happy paths and outward focused error cases (e.g. establishing what should happen if a user were to provide the incorrect credentials during authentication).
If working within an organization that has dedicated product teams, this document will likely look very similar to the type of documents that product teams provide - but it is important that an engineer is involved in the process of building out the PRD that will be used for the agentic engineering workflow.
The result of this process should be to produce a document that can be used to facilitate discussion in the next phase, the Architectural Review Document.
When producing the PRD with an agent it is worth creating a /write-a-prd skill.
This skill might look something like:
---
name: write-a-prd
description: Create a PRD through user interview, codebase exploration and then write the PRD to the project. Use when user wants to write a PRD, create a product requirements document, or plan a new feature.
---

This skill will be invoked when the user wants to create a PRD. You may skip
steps if you don't consider them necessary.

1. The projects context should be in the conversation. If it isn't, read
   context/projects/README.md.

1a. The projects design goals should be in the conversation. If it isn't, read
context/design.md.

2. Ask the user for a long, detailed description of the problem they want to
   solve and any potential ideas for solutions.

3. Explore the repo to verify their assertions and understand the current state
   of the codebase.

4. Interview the user relentlessly about their concept in relation to the
   existing application until you reach a shared understanding.

5. Once you have a complete understanding of the problem and solution, use the
   template below to write the PRD. The PRD should be written to the project.
   It must hard wrap the lines to a maximum width of 72 characters so that it
   is easily read in a terminal.

<prd-template>

## Problem Statement

The problem that the user is facing, from the user's perspective.

## Solution

The solution to the problem, from the user's perspective.

## User Stories

A LONG, numbered list of user stories. Each user story should be in the format of:

1. As an <actor>, I want a <feature>, so that <benefit>

<user-story-example>
1. As a mobile bank customer, I want to see balance on my accounts, so that I
   can make better informed decisions about my spending
</user-story-example>

This list of user stories should be extremely extensive and cover all aspects
of the feature.

## Out of Scope

A description of the things that are out of scope for this PRD.

## Further Notes

Any further notes about the feature.

</prd-template>
The Architectural Review Document
The architectural review document (ARD) is meant a document that outlines architectural decisions for the feature or project in mind. This is the opportunity to go deep into the engineering decisions and should be focused around the purpose that the PRD has established.
Similarly to the PRD, there is a good framework around what this skill might look like when working to produce this document agentically.
---
name: write-a-ard
description: Create a ARD through user interview, codebase exploration and then write the ARD to the project. Use when user wants to write a ARD, create a architecture review document, or architecturally plan a new feature.
---

## Process

1. The project's context should be in the conversation. If it isn't, read context/projects/README.md

1a. The project's design goals should be in the conversation. If it isn't, read context/design.md.

1c. The project's workflow process should be in the conversation. If it isn't, read the context/workflow.md.

2. If the PRD is not in the conversation. Check if there is a PRD in the project and read it if there is. If there is not, just ask the user for what this project is focused on.

3. If you have not already explored the codebase, do so to understand the current architecture, existing patterns, and integration layers.

3a. Read context/coding_standards.md and ensure the ARD conforms to it (memory via arenas, modules as compiled libraries, the C/C++ seam, interface error-handling, and testing). Address its ARD/IMPL conformance checklist in the ARD.

4. Interview the user relentlessly about every aspect of this plan until you reach a shared understanding. Walk down each branch of the design tree, resolving dependencies between decisions one-by-one. ASK ONE QUESTION AT A TIME.

5. Sketch out the major modules you will need to build or modify to complete the implementation. Actively look for opportunities to extract deep modules that can be tested in isolation.

A deep module (as opposed to a shallow module) is one which encapsulates a lot of functionality in a simple, testable interface which rarely changes.

Check with the user that these modules match their expectations. Check with the user which modules they want tests written for.

6. Once you have a complete understanding of the problem, solution, architecture, proposed changes, and how they fit in or would modify the existing architecture, use the template below to write the ARD to the project. Make sure that we hard wrap the lines at a maximum width of 72 characters so that it is easy to read in a terminal.

<ard-template>

## PRD

A reference to the PRD that was evaluated to create this. If there was no PRD simply put the summary of the goal of this effort here.

## Explanation Architectural Components

This should be an explanation of Modules in play with the change, how they currently relate to each other, and any changes that would have to occure to facilitate the solution.

## Interfaces

In this section it outlines the different interfaces involved. This could be a new payload structure for a new endpoint in an http based API or it could be the interface of a module.

## Out of Scope

A description of the things that are out of scope for this ARD.

## Further Notes

Any further notes about the feature.

</ard-template>
The Implementation Document
This is where we actually break down the tasks that need to be done, their priority and their dependencies. This is the core document that will guide the agent during the Ralph Looping process.
It is important to reference the PRD and the ARD during this process. Those two documents help frame how tasks will be broken down. Working with the agent to produce this, we will want to be sure to load into context the results of the PRD and the ARD. You can use a skill like the following to help create these tasks and the document.
---
name: write-a-impl
description: Create an Implementation Plan through user interview, codebase exploration and then write the impl.md to the project. Use when user wants to write an IMPL, create a implementation plan for a new feature.
---

## Process

1. Read context/README.md and context/projects/README.md if you have not read it this session, to understand the structure of projects and what projects exist.

2. Ask the user for the current project-slug if you don't have it in this session.

3. Read all the files within `repo_root/context/projects/<project-slug>/` to gain context about the PRD and ARD if you don't already have them in this session. If the project directory doesn't exist simply operate off the context in the current session.

4. If unfamiliar with the codebase, launch an Explore agent to map architecture, existing patterns, and the integration layers relevant to this feature.

4a. Read context/coding_standards.md and ensure the implementation plan conforms to it (memory via arenas, modules as compiled libraries, the C/C++ seam, interface error-handling, and testing). Address its ARD/IMPL conformance checklist when scoping tasks.

5. Decompose requirements into tasks. Each task is scoped to produce a working, verifiable increment, minimizing integration risk and enabling continuous delivery.
	a. Break the requirements into layers appropriate to the architecture (e.g. UI → service → domain → infrastructure for web; protocol → handler → domain for backends).
	b. Plan tasks based on the layers, bottom-up (infrastructure/domain first, UI last) so each task lands on already committed foundations. Each task should be a single commit/PR that proves a checkpoint toward the goal.
	c. Ensure each step/task is independently buildable, testable, and releasable. If this is impossible, present the issue to the user and ask for guidance.
		- buildable - it must successfully compile & build without issue
		- testable - all of the tests in the test suite must pass, including tests that were added for it
		- releasable - the current state of the repository, including tasks that came before the current task, must be **safe to be shipped** without having negative impacts on user experience or breaking backwards compatibility. If a task can't be safely user-facing yet, it's still releasable when gated behind a flag/disabled config

6. Review task breakdown with the user. Present the proposed tasks as a numbered list of tasks, shown as follows:
	- **Title**: short descriptive name
	- **Blocked by**: which other tasks (if any) must complete first
	- **User stories covered**: which user stories from the PRD this addresses if a PRD is present

7. Ask the user the following and iterate between step 6 and 7 until the user approves the breakdown:

	- Does the granularity feel right? (too coarse / too fine)
	- Are the dependency relationships correct?
	- Should any tasks be merged or split further?

8. Write the implementation plan in the project at `context/projects/<project-slug>/impl.md` with hard wraping at a maxmimum width of 72 using the following template:

<impl-template>
# Implementation Plan - <project-title>

## Summary of Tasks

This section contains one line summary description of the tasks in the sequence they should be tackled.

## Task Dependency Relationships

This section outlines the dependencies between tasks as a visual ascii art diagram.

## Detailed Tasks

This section has all of the tasks in the sequence they should be tackled in using the task template below for each task.

<task-template>
### Task <task-number> - <task-short-descriptive-name>

- **Status**: pending / complete
- **Blocked by**: which other tasks (if any) must complete first
- **User stories covered**: which user stories from the PRD this addresses if a PRD is present

#### What to build

A concise description of this task. Describe the end-to-end behavior. Reference specific sections of the parent PRD rather than duplicating content.

#### Technical Details

A concise description of related technical details (architectural changes, etc.). Reference specific sections of the parent ARD rather than duplicating content.

#### Acceptance criteria

- [ ] Criterion 1
- [ ] Criterion 2
- [ ] Criterion 3
</task-template>
</impl-template>
PRD, ARD and Implementation Documents
In some situations there may not be a need for all three documents - the product requirements document, the architectural review document and the implementation document. There are some situations where we can simply skip to creating an implementation document. One such example might be updating a simple dev dependency.
Generally speaking though, all three documents are helpful in building context both for the agent and for the engineer. There are times that while producing the implementation tasks, a design decision made in the ARD doesn't actually make sense.
The goal of these documents is to bring as much structure so that the agent has a more deterministic output of results - deterministic in terms of satisfying product requirements and good architectural design patterns; the actual contents of function bodies or function signatures will change unless you go as deep as specifying those details.
The Ralph Loop
With the PRD, ARD and the implementation document generated, we are ready to
proceed to the Ralph Loop. The loop is built on the back of a bash script and the
use of the almighty claude -p.
The script has a core responsibility of ensuring that the loop does not go unchecked, resulting in it eating up all of the session allowance; or worse running up that token bill. The way this is done is two-fold:
-
A termination sequence is provided that the loop looks for and exits the loop.
-
A max allowance of loops is provided as an argument. This both prevents the possibility of a runaway loop and allows you to manage how many loops you would like to manage in the cases that you want to have check-ins.
#!/usr/bin/env sh

# Exit on error
set -e
# (Optional) Treat unset variables as errors
set -u

max_iterations=${1:-}
prompt_md_file_path=${2:-}
sentinel=${3:-}

if [ -z "$max_iterations" ] || [ -z "$prompt_md_file_path" ] || [ -z "$sentinel" ]; then
  echo "Usage: $0 <max-iterations> <prompt-md-file-path> <sentinel>"
  echo "Examples:"
  echo "  max-iterations: 10"
  echo "  prompt-md-file-path: RALPH_PROMPT.md"
  echo "  sentinel: <promise>RALPH_BREAK_LOOP</promise>"
  exit 1
fi


echo "Ralph Setup"
echo "  max-iterations: $max_iterations"
echo "  prompt-md-file-path: $prompt_md_file_path"
echo "  sentinel: $sentinel"
echo

i=0
while [ "$i" -lt $max_iterations ]; do
  echo "Iteration $i"
  echo "-----------------------------------------------------"
  cat "$prompt_md_file_path" | claude --model sonnet --allow-dangerously-skip-permissions --dangerously-skip-permissions --print --output-format stream-json --include-partial-messages --verbose | claude-json-pp --sentinel "$sentinel"
  status_code=$?

  if [ "$status_code" -eq 1 ]; then
    echo "Sentinel detected - breaking out of Ralph loop"
    break
  elif [ "$status_code" -gt 1 ]; then
    echo "claude-json-pp error ($status_code) - breaking out of Ralph loop"
    break
  fi

  # next iteration
  i=$((i + 1))
done

echo "Iteration $i"
echo "-----------------------------------------------------"
echo "HIT MAX ITERATION ($max_iterations)"
echo "Exiting..."

exit 0
To run this script, you must provide a markdown file that is the core of the prompt. The markdown file being provided should include the path to the project that is being implemented on and any additional context on a per-loop basis. An example of this might look like:
study context/projects/README.md
Read all files in context/projects/<whatever_project_being_worked_on>
Select the most important task from the implementation plan that is NOT
complete/done and ONLY work on that

IMPORTANT:
- ONLY DO THE ONE TASK!!!
- write state based tests & write code such that it is easily testable via
  state based tests
- after making changes to a file run the formatter to format it, run the tests
  to make sure it is good, and
- update the implementation plan when the task is done
- when tests pass and the task is complete, commit the changes, and exit
- if you notice the implementation plan is complete, output
  <promise>RALPH_BREAK_LOOP</promise>
- if you run into a case where you need a tool/dependency that isn't present,
  output <promise>RALPH_BREAK_L
Loop Completion
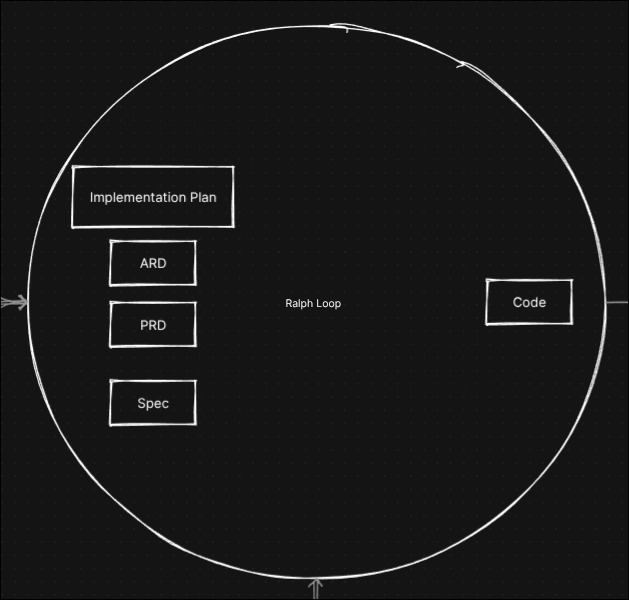
Once the loop terminates, either because the sentinel value was reached or because the max iteration count was hit, it is time to evaluate and test. There are many options for how to proceed. You can load up an agent to evaluate what has been produced and compare it to the PRD, ARD and Implementation Documentation. You can be more hands on and explore the code base by hand. But one of the most important parts of this process is to manually test. At this point, you should be able to do that - assuming what you're working on is manually testable.
Once tested, you are ready to ask a very important question, "Is this good enough to share with others on the internal team?" If so, then you can get it staged and shared however it is you do that.
If the answer is no, then this is your opportunity to make adjustments to the PRD, ARD and/or Implementation Documentation and then to iterate through the loop again.
Acknowledgement
I would be remiss if I were to not acknowledge that the agentic software development lifecycle presented here was not a result of significant collaboration with some dear friends and colleagues, Drew De Ponte and Ryan Hedges. Between the three of us we researched, debated, tested theories, pivoted and tested again to get to where this software development lifecycle landed.
I recommend you check out Drew De Ponte at his website https://drewdeponte.com. He has built many tools, none better than Git Patch Stack which I strongly encourage you to check out.
You can find Ryan Hedges at https://www.ryanhedges.com.